Opening the settings window
To configure your Radar Screensaver you must open its configuration window. To open settings window, go to the "Display" applet on the Windows control panel. There, switch to "Screensaver" tab and choose the Radar Screensaver from a list of the screen savers installed on your system. Press the "Settings..." button and Radar Screensaver settings window will open.
You will see a dialog window with four tabs and buttons: "OK", "Cancel" and "Help". To get help on particular control element on a window, click with the right mouse button on it and choose "What is this?" context menu item. To get help page for the whole tab, press the "Help" button or F1 key.
Environment settings
First tab of the configuration window is "Environment" tab with settings of model environment: background color and image, light sources count, colors and brightness, camera distance. Below is a screenshot of this tab:
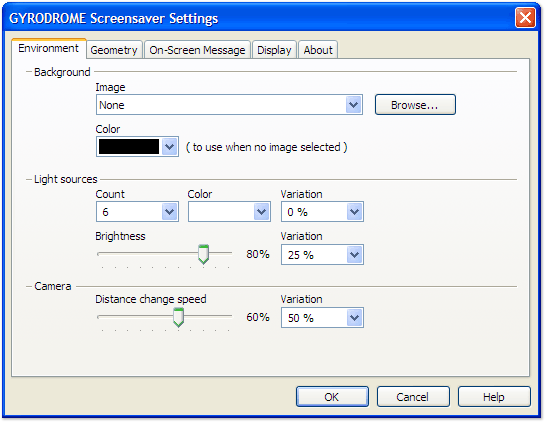
- Background settingsThese determine look of scene background: it can be either image or uniform color.
- Image This is background image. Choose one of the preinstalled background images or choose your own, recently used. To choose your another image, use the "Custom..." button. If you do not wish to use background image, choose 'none' and color option for background became available.
- Color Background color which will be used instead of background image when it is disabled. You may choose one of default colors or set your own by selecting the 'Custom...' item. This will open standard color selection window where you will be able to choose any color for background.
- Light sources These determine amount of light sources, their color and brightness.
- Count This determine how many light sources must present in animation. To get a picture with a lot of fantastical highlights, choose more light sources.
- Color By default, all light sources will be white. If you want to additionally to tint the whole animation, you may change this setting. You may choose one of default colors or set your own by selecting the 'Custom...' item. This will open standard color selection window where you will be able to choose any color for lights.
- Color Variation This is a percent of color randomness. 100% is fully random color and 0% mean that color will be fully determined by color selection box at left.
- Brightness This slider allow you to choose how bright each light source will be. The 100% value means balanced lighting, but lower values will give you the more dark scene.
- Brightness VariationThis value is a percent of brightness randomness. If it is not 0%, the light sources brightness will vary from one light to another.
- Camera Set camera distance changing speed and amount of changes.
- Distance Change Speed The camera can not only fly around the rings at permanent distance. The camera distance can be changed during animation. The speed of distance change can be set by this slider. At 0% value the camera will remain at constant distance during animation.
- Distance Variation This is a percent of maximum allowed camera closing to rings. Set 0% to disallow camera distance changes, and set 100% to allow the camera to move closely to rings as possible.
Geometry settings
Second tab of the configuration window is "Environment" tab with settings of model environment: background color and image, light sources count, colors and brightness, camera distance. Below is a screenshot of this tab:
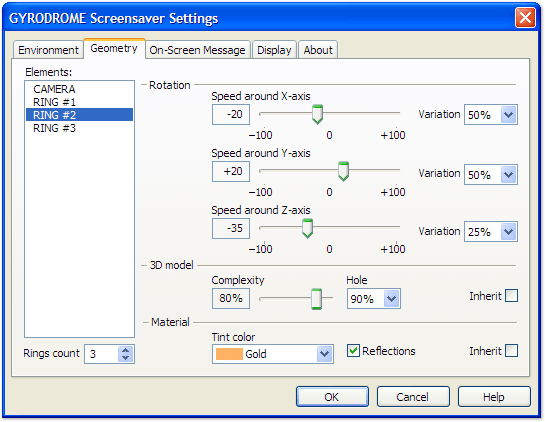
- Elements There are two types of animation elements: camera and ring. There can be several rings in animation. To set how many rings must present, use the "rings count" box. Each ring parameters and camera rotation parameters can be set independently. To indicate which of the element you wish to change, choose it at list.
- Rotation settingsThese parameters determine speed and randomness of rotation around three axes: X, Y and Z. The camera and first ring rotates relatively to world, so if you will set a speed of their rotation to 0, they will be fixed during operation. If you will set a speed of inner rings to 0, they will be fixed relative to outer rings, so if the last are rotating, the inner rings will rotate with them synchronously.
- Speed around X-, Y-, or Z-axis Rotation speed can be positive or negative. +100 is maximum speed of rotation clockwise and -100 is maximum speed of rotation counter-clockwise.
- Speed Variation This value is a percent of rotation speed randomness. The rotation speed of each ring or camera will be calculated at animation start and will remain constant during it.
- 3D Model There you can set some geometry parameters of the ring 3D model.
- Complexity This is a relative parameter. Larger values of it means more complex, detailed and smooth ring 3D model. Large values may affect performance of your graphic card.
- Hole This is a relative ring hole size. It is a percent of outer radius. The more this value – the more narrow ring you will see.
- Inherit It could be tiring to set geometry parameters for all of the rings. Check this box and the ring will inherit parameters from previous one. Note, that this checkbox is not available for the Ring #1.
- Material The rings are all metallic, but there you can set tint color and realism of each ring model.
- Tint color Choose tint color for the ring to give it a look of some kind of metal. There are some common metal tint colors already, but if you wish to set your own, choose the 'Custom...' item from the list. This will open standard color selection window.
- Reflections Check this box to enable reflections – this will give more realistic look to the ring. Note, that this option usually doubles a load to graphics card.
- Inherit To take material settings of the ring from the previous one, check this box. Note, that this option is not available for the Ring #1.
Message settings
Third tab contains settings for message you may want to leave for someone who may visit your workplace and will try to close screensaver:
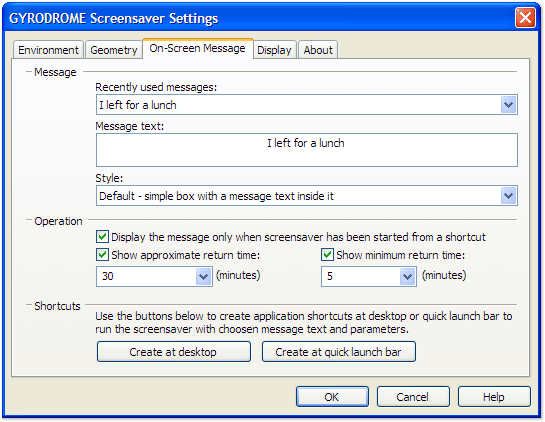
- Recently used messagesThere is a list of message text you used recently. Choose one and it will be copied immediately into the message text box below.
- Message text Type text of your message there.
- Style Choose one of two styles of message box. First is default and second implemented in gyrodrome style.
- Display the message... Enable this option to disallow showing the message when screensaver starts automatically after some idle time.
- Approximate return time You may type there approximate time you will be out of your PC. When screensaver will show the message, it will calculate approximate time before your return and will show it.
- Create shortcut at desktop Press this button to create an application shortcut on your desktop. It will be named as 'Gyrodrome (n)' where n – is some number used to avoid duplicate names. You can later rename it to more descriptive name. Use this shortcut for immediate screensaver start.
|
- Minimum return time If you underestimated the time of your absence and approximate time run out, you may use this option to disallow showing the time less than amount set here.
- Create at quick launch bar Press this button to create an application screenshot at quick launch bar instead of desktop.
|
Configuring display
Fourth tab of configuration window is "Display". It allow to set animation smoothness, display resolution and multi-monitor configuration settings (if your PC has more than one video display).
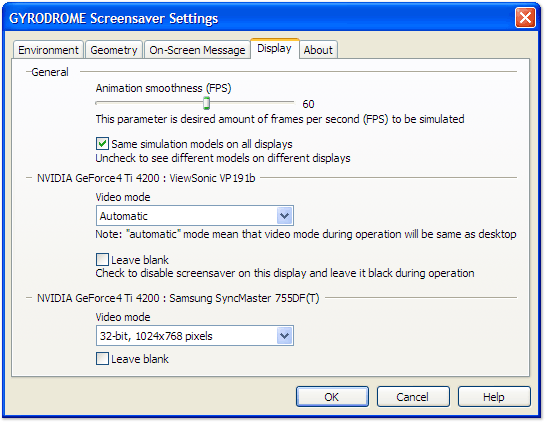
- Simulation smoothnessThe higher values – the smoother animation – the more computational requirements to your system (processor and graphics card). It is measured in Frames-Per-Second (FPS). Note, that this value is only desired smoothness. If you will set it too high, but the system will not be capable to achieve it, the screensaver will smoothly reduce it automatically to avoid jerky animation – this will look like slowed animation within first few seconds.
- Same simulation models on all displaysThis option is available if your PC has two or more monitors attached. Check this box to see same situation model on all displays involved in operation.
- Video modeThis is a parameter of your display. Choose the resolution and color quality to use in full-screen operation. Choose 'Automatic" to allow the screensaver to use current desktop resolution.
- Leave blackThis option is available if your PC has two or more video displays attached. Check this box to disable animation on this display. It will remain black during operation.
The "About" tab
The Fifth and last tab of configuration window is "About". There you can find software developer contact information, your registration information (registered user name and key code). In addition, there you will be able to view the text of license agreement, look for updates, and change user interface language.
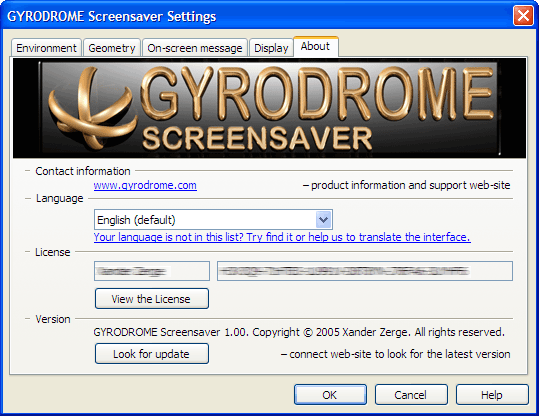
- Contact informationThis part of tab contains a hyperlink to software information web-site.
- LanguageChoose the user interface and/or on-line help language from installed on your system. Gyrodrome Screensaver 1.00 includes only English language. Use the link below to get additional interface translation packages. There you will find the information how to translate the interface/help by yourself. We promise that you will get a free key code in case if you will be the first who made and sent it to us.
- LicenseThere you may see the registered user name, key code, and a button to view the license agreement. Note: if your copy of screensaver is not activated yet, you will be able to enter your registration information here and activate it with "Activate" button.
- Activate If your copy of the Radar Screensaver is not registered yet, type your registration information and press this button to activate your copy.
- VersionThis part of tab contains your current version number and copyright notice.
- Look for updatePress this button to open a small internet browser window, which will request software web site for available updates. It will transfer to the site only version number.
Back on top